Wednesday, March 30, 2016

Onigirazu #1 Hamburger

Hi Everyone,


Today I decided to make my second attempt ever at Onigirazu.
Onigirazu is similar to Onigiri. Onigirazu, instead of shaping it with your hands (which is what the Nigiru means), you simply sandwich it between nori. The ZU in Onigirazu is a negative, to say it's not shaped with the hands....my knowledge of Japanese is limited. I'm going to hope Emily shares some notes T.T

I figured since I had the ingredients for a hamburger it'd be the first one I'd make for you guys.
You can choose whatever fillings you like for onigirazu and I hope to be adding a few more filling ideas in the future.

Anyway here we go!

To make 2 Onigirazu you'll need:

Cling wrap
onigirazu shaper (OPTIONAL)
Approximately 2 cups of japanese cooked rice, hot and seasoned with salt (to your taste).
2 sheets of nori
Approximately 1/4 pound of ground beef (you can use other kinds of meat if you don't like beef)
1 slice of processed cheese (I chose white processed cheese because I keep hearing it's seen a lot at Japanese grocery stores)
1-2 thin slices of tomato
1-2 thin slices of onion
Kewpie Mayo
1 lettuce leaf (I was going to put this in mine but.... I kinda over filled them...and couldn't fit it in)

                                                 
 Other options: whatever you like putting on a burger ^.^ I                                                                 was tempted to buy an avocado for this...ya ya I know "ew!"


Shape your ground meat of choice and cook, after I took this picture I put cheese on them
I was cooking burgers for dinner at the time too, so the bigger ones were definitely not for onigirazu.


First lay down a piece of nori sheet and put a thin layer of rice if using a shaper try to gauge how much filling you plan to put in and try to adjust the amount of rice. Those free handing it, make a thin layer of rice on the nori, when I made it without a shaper I aimed for a square shape.


Add your fillings
....I kind of over filled mine this time....hey I was hungry

Then add another thin layer of rice.
If you have the shaper you'll use the little mold pusher to flatten the onigirazu down a bit, pretty much the same if you use an onigiri mold when you make onigiri.


Then fold up the onigirazu, this one i had too close to the end, i suggest putting it in the center.
Wrap in Cling wrap and let it sit for a while. This is to let the nori soften up.

 ...mine looks so ugly T.T but he'll be tasty I just know it.

After about 10 minutes or so take a sharp knife and cut it in half. Remove the cling wrap after cutting.


Put it in your bento and let it completely cool before putting on the lid.
And now it's done ^.^


Don't you just love Totoro?
.....what?....I'm not the only 28 year old with a Totoro bento
....that's my story and I'm sticking to it


I hope you try this for yourself. Like always if you have an requests please leave me a comment and I'll try my best ^_^


Tuesday, March 29, 2016

Visual Traditions of Japan Class

Hi Everyone!

So this morning my dad called me from work asking me if I wanted to take a class at the Carnegie Museum. I was um.....asleep at the time and he kept going on about how if I wasn't interested we didn't have to go...and he repeated the words "Japanese Art" a few times.

Finally it clicked and nerdy me went "YES!"

So I'll be going to an art history class for the next four Saturdays, so excited ^_^

The class is examining the art from Japan's prehistoric period to the 20th century and seeing how the Japanese took foreign artistic elements and adapted it to create work that is uniquely Japanese.

I hope I explained that well...

There are 2 sets of classes, there are ones on Saturdays starting April 2nd and ending April 23rd, then there are Wednesday classes starting April 6th ending April 27th.

It's $80 for an adult, $50 for students, and if you're a member at the museum it's $64.
When I tried to get us enrolled it wouldn't allow us to pay for the admission, my mom then tried and the same issue occurred. Every time we entered our credit card information it would give the error "please check your address and verify that it matches with your provider" something like that and we'd check to make sure the address was fine, it was then we'd get the error again.

Mom was the hero and called the museum where they processed the payment over the phone and sent us a receipt by email. So if you do wish to enroll if you get a similar error they are able to do the enrollment over the phone.


So excited! I'll share how the first class went this weekend ^_^

If you'd like to enroll I've provided the link below:
http://www.cmoa.org/CalendarEvent.aspx?eid=26909&cat=All


Saturday, March 26, 2016

Simple Miso Soup

Hi Everyone!

Miso Soup, very versatile, so many ingredients can go into it changing the flavor. Before we go into anything "fancy" or "different" here's the simple tofu and wakame miso soup.


You'll need:

4 cups water
1 TSP Dashi (I prefer bonito dashi but kombu dashi works well too)
3 TBS Miso Paste
1 TBS Dried Wakame
2 Green Onions
Tofu (your choice in the consistency)


What is Miso Paste? It's fermented edamame, that's the easiest explanation I have. It comes in various colors and tastes.

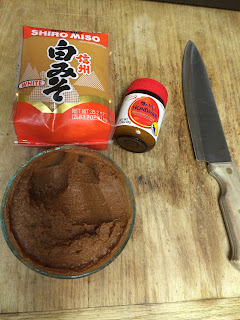
The mains ones are Shiro Miso (White Miso) and Aka Miso (Red Miso), they also do a mixture of these two together. I have Shiro Miso still in its packaging (this tastes lighter than the aka miso) and my Aka Miso in a glass container (aka miso tastes "meaty" it just has that flavor note that many meat broths have).

Today I used Aka Miso for our Miso Soup.


What is Dashi? Dashi is stock/broth. Usually Bonito (it's a fish that's related to the Tuna, so I'm just going to call it tuna for the sake of my sanity), there's also Kombu a type of seaweed, and there's also Sardine and Shiitake Dashi.  For this recipe I used Bonito Dashi, I also recommend Kombu Dashi.


There are miso pastes out there that already have the dashi incorporated into it. If you have one of these types of miso pastes please omit the step with the Dashi for this recipe.


In a pot bring the water to a boil (I usually leave it on medium heat). Add 1/2 TSP Dashi.
While it's heating up prep your tofu. I used Firm tofu. I wrapped the two slices in paper towel and set a glass bowl on top of it. This will help remove some of the brine the tofu comes in.


Once the Tofu is ready, cut it into cubes. The easiest way is to cut it while the tofu is in your hand...just don't cut your self in the process. If you're uncomfortable with this technique slowly cut it into cubes while it sits on your cutting board.

Afterward cut your green onions into diagonal strips.

Add both the tofu and the green onion to the now hot dashi stock. Let it cook for about 5 minutes.
Do not stir too much you don't want to break the tofu into pieces. If you stir do so gently.


What is Wakame? Wakame is a type of sea weed. It is used in salad, soups etc. Plus it's high in vitamins.

Measure your wakame.


Add it to your miso soup along with the other 1/2 TSP Dashi. Let it cook for 3 minutes.
Below is what it looks like when you first add it to your soup.
What it looks like after 3 minutes

Now in a bowl put your 3 TBS of miso paste.
Add some of the Broth to the miso paste and stir.
If you dilute the miso paste in brother first before adding it to the soup it incorporates faster when you add it.


When you add this to the soup, do not boil the soup!
Just let it heat up and serve immediately ^__^


I hope you try this recipe out. I'll post different kinds of miso soup in the future ^__^

Mini Web Mistress Gypsy hopes you Enjoy.
Gypsy: "I'm ready for my close up Mr. Demille!"


Rice - Gohan

Hi Everyone!

Phew getting these recipes out quickly is a bit rough, but Emily arrives in Japan literally in the next hour or so. I'd like her to have something for her first day  ^_^

Gohan: Means cooked rice, rice is that important that it gets to be the word that defines your meal.

Asagohan: Breakfast
Ohirugohan: Lunch
Yuugohan: Dinner

Notice the pattern?

Today I'll show you how I make rice.

In Japan they have Japonica rice, it's a short grain glutinous rice. Great for chopsticks to pick up with ease and just tastes great.


I use a rice cooker, the brand I have is Zojirushi. It's very easy to use, it comes with a little measuring cup and you just fill it up with how much rice you want and there's a little line inside the bowl that tells you how much water is needed for how many cups you put in it.

Now what if you lost that little cup? I know it's happened before to someone you feel doomed and you try to measure rice in your measuring cup and for some reason the rice doesn't taste the same or doesn't cook the same. Helpful hint, the measuring cup they give you does not equal 1 US measuring cup. It actually measures at 3/4 cup so if you ever lose that precious piece of plastic you now know how to measure without it.

Today I had made 2 cups of rice. Now it sounds so easy just dump the rice and put in the water put it in the machine and press start..........no.......don't do that....please pretty please. You need to WASH your rice first, unless you're in Japan and are able to purchase pre-washed rice, yes that exists and I wish it existed here.

First you measure your rice, put it in the bowl.
Add some water and slowly move your fingers around in the bowl don't be too rough you don't want to break the grains of rice.
You'll begin to see the water get cloudy and white.
This is the first washing, it looks like the rice is sitting in milk.


Drain this water and repeat the washing for a second time.
This time you'll see that it's less cloudy.
Drain this water and repeat this step 1 to 2 more times.
You'll see the water get clearer, we're not aiming for perfectly clear but we don't want the water to be murky either.
I washed mine 3 times. This helps to remove some of the gluten at least that's what I hear.

After draining, you'll fill up the bowl to the water line of how many cups you put in.
I did 2 so if you see the line I put it at was between the 1 and the 3 for the white rice marker.

I then took this to my rice cooker and put it in, closed the lid, plugged in the cooker.
Made sure it was on the setting for white rice and pressed start.
It took about an hour to cook.

I would like to say in the most nerdy fashion, my rice cooker SINGS to me.
This is seriously like the most idiotic thing to love about a rice cooker but I just get all happy when it starts playing its chime to tell me I set it to cook and playing again when it's done.
*Nerdy squeal of joy!*

After the rice cooker tells you it's done doing its job, do NOT open the rice cooker, let it chill out for 10 minutes or so. The rice will improve in texture if you do this, I'm not sure why if anyone can explain that please do I'm all ears.

Once those 10 minutes are up, take your rice paddle and make little slashes into the rice, I do it in both directions so it looks like a checker board. I then proceed to flip the rice and slash a few more times so the rice is fluffed up.

I hope this tutorial was helpful.
If you have a rice cooker that's a different brand just follow the instructions for it along with washing the rice and you should have great tasting rice ^__^

Beef Kushiyaki

Hi Everyone!

Kushiyaki refers to all foods that are skewered and grilled.
Tonight I made Beef Kushiyaki, Caroline style.
Terrible picture I know, but I'm opting for the non photo-shopped look.
I swear it's not burnt! Just horrible horrible lighting! I was not going to spend an hour photographing my dinner for the perfect shot....darn it I was gonna eat that piping hot!

This recipe is versatile and can be done with Chicken, Pork, Beef, Shrimp, the marinade is basically homemade Teriyaki sauce with garlic and ginger added to it so the sky's the limit on what you can cook it with.


The things you'll need:
1. 1 TBS sugar
2. 2 TBS Mirin (sweetened rice wine)
3. 2 TBS Shoyu (soy sauce, please try your best for a Japanese soy sauce, taste varies by country)
4. 2 TBS Sake (if you can't find sake, Sherry will work just fine)
5. 1 TSP ginger paste
6. 1 TSP garlic paste
7. 1/2 pound beef cubed
8. 1 Ziploc bag or 1 container with a lid
9. bamboo skewers, soak in water for about 1 hour, this will prevent them from burning
10. a grill or griddle, heck if desperate use a frying pan

Cut the beef into bite sized cubes, the goal is to be able to eat one right off the stick and avoiding choking hazards.

In a Ziploc bag put all the ingredients except for the beef together.
Today I was out of sake and sherry (a truly rare day) so I used some white cooking wine.


Use your hand and massage the Ziploc bag until the garlic and ginger paste incorporate into the mixture.
Add the beef and let it marinate for at least 1 hour. The one I made today I had put it to marinate at about 11 AM and cooked it at 8 PM.
Put the meat on the skewers.


With a paper towel blot the excess marinade off the beef.


I used a indoor electric grill to cook these, you can use your outdoor grill or as I said before if desperate a frying pan or griddle will work well too.
I sprayed the grill with some Pam and cooked the beef on medium-low heat, it took about 15 minutes, I rotated the skewers 3 times and left them on each side for about 5 minutes to cook and the meat stayed moist. You can also do this on high heat to get a better sear.

If you do not have access to Pam, dipping a paper towel that's been folded into a little square in some vegetable oil and gently coating the grill or pan will work well too.

This recipe can be done with cubed beef or thin sliced of beef skewered, I've done both and both turn out really well.

I had this with a touch of wasabi and served it with miso soup and white rice.


I hope you give this a try.
P.S. what do you think of my Sailor Moon hashi (chopsticks)?

Mini Web Mistress Sasha patiently waiting for a sample of tasty tasty beef


WELCOME!

Hi Everyone!


My name is Caroline and welcome to Pittsburgh Otaku.
The reason why I started this blog was because my best friend Emily has gone to Japan.
She’ll be studying for an entire year at J.F. Oberin University in Machida, Tokyo, Japan.
Needless to say I’m going to miss her dreadfully, going from talking everyday on Skype to about once a week is hard to do.
I wanted to stay part of my best friend’s life, and honestly had a hard time coming up with an idea. Then it hit me like a ton of bricks.  I was asking her how she’d be handling meals while she was in school there, thinking there’d be cafeteria’s  like there are in colleges in the U.S.. She wasn’t all that sure but thought she’d mostly be on her own in the food department. Now I just love to cook…and eat…hey how do you think a plump girl like me gets so fluffy? The idea of my bestie being stuck in Japan without much Japanese cuisine background bothered me; I had to think of something. So I came up with Pittsburgh Otaku.

I figured Emily could learn some simple Japanese food and at the same time I’d be helping out my fellow Pittsburgh Otakus, hey I can’t be the only otaku in Pittsburgh.
Here I’ll post pictures of food I cook along with the recipe and any tweaks that can be done to the meal being shown. Most of them will be Japanese but I will branch out after a while. I’ll explain the ingredients and try my best to describe what they taste like.

So while my bestie is living every otaku’s dream, here we’ll bring some Japan to Pittsburgh J

Things you’ll see at Pittsburgh Otaku:

1.      Recipes: the whole reason why we’re here. Japanese, Korean, American, Brazilian, the list goes on.
2.      Crafts: knitting, crochet, embroidery, I’m a sucker for all of them; I’ll share some of my work and hopefully a pattern or two.
3.      Snack Reviews: Sometimes when I go to the Korean or Japanese grocery stores in my area I can’t help myself. I’ll pick up candy, chips, crackers, drinks, if it’s got a fun looking package I tend to buy it. I’ll post pictures of the snack and let you know what I think, maybe you’ll go try it yourself J
4.      Beauty Products, I won’t lie, I’m a total addict for Shiseido, Tony Moly, and Dr. Jart. Slowly I’ll put up some reviews of products and some tips I find for example the double cleanse.
5.      Weight Loss: Last but definitely not least I’ll be blogging my journey to a thinner otaku. Incorporating Japanese food and increasing my walking will hopefully defluff this super cupcakey otaku. Please feel free to join me on this experiment. We may not live in Japan but we can surely try to mimic some of their healthy lifestyle.


I hope you enjoy your visit at Pittsburgh Otaku.
Please feel free to ask me questions and make requests.

Thank you J
Mini Webmistress Luna hopes you enjoy your visit.