Showing posts with label recipe. Show all posts

Monday, May 30, 2016

Gyoza Version 1

Hi Everyone,


I have been totally neglecting my site which I apologize for. I was all set to post my nikujaga recipe last weekend but apple decided to sabotage me. I was transferring my pictures and it asked me if I wanted to update my phone, I figured  sure why not...big mistake I spent 2 hours starting around midnight trying to get my phone to function, because itunes decided to have an error while updating. I wasn't able to turn on my phone or run anything, it just kept showing I needed to install itunes onto my phone which at that point my computer and itunes refused to recognize my phone. Two hours later I finished fixing my phone.....then went to bed since I lost most of my pictures especially my step by step for the nikujaga it managed to only save a few though so I was lucky at least a little bit.

Today I'm going to show you how to make Gyoza. I'm also going to show you how to freeze them so you can have a quick dinner. I love freezing these because it's so convenient, plus tastes better than the store bought frozen gyoza.

You'll need:

1/2 pounds ground meat
1 cup thinly diced cabbage
2-4 green onions thinly chopped
1 TSP sesame oil
2 TBS shoyu
2 TBS mirin
2 TBS sake
1 TSP garlic paste (optional)
1 TSP ginger paste (optional)
1 TSP salt
1/8 TSP pepper
1 package of large gyoza skins/wrappers or 2 packages of smaller sized wrappers
pam


When it comes the the ground meat there's plenty of ratios you can use of different meat types.
My personal favorites are all beef or a half and half mixture of beef and pork. I've also done all pork as well.

I'm also going to try in the future ground chicken or turkey or where I put it as half and half like half pork half turkey, but that's for another day when I feel like experimenting.

In a bowl put the green onion, cabbage, garlic, ginger, salt, pepper along with the ground meat.


Mix the ingredients until they start to combine. Then add the rest of the ingredients and mix some more.

Now cover the bowl with plastic wrap and let it sit in the fridge for about half an hour, you can let this sit overnight as well.


While I was waiting for this to marinate I started making dinner I was hankering for some tacos...and it used up the other 1/2 pound of the ground beef I used.

After the half hour is up get out your wrappers and a small bowl with some water.
Now I am about to show you my FAVORITE little kitchen gadget so far....I say this as my kitchen-aid mixer looks at me like I've betrayed him...

This is a gyoza mold, you can get it from Amazon for about $5.
I used to fold my gyoza by hand and it took FOREVER with this little guy about 20 minutes, saves so much time.


Below is my little gyoza making station. Not pictured is a sheet pan I liberally sprayed with some pam. 

Take your first Gyoza skin and place it on the folder. Take a butter knife or small teaspoon and add some filling to the middle.  Wet one half of the gyoza wrapper with some water and fold.


Place it on the sheet pan and repeat until you've run out of wrappers. I tend to have a little bit of extra filling left with this recipe. I ended up this time with about 1/4 cup of mixture which I'll used later this week. I'll cook it up and put it on top of some rice.


Now once you're done put these little guys in the freezer. No need to put plastic wrap on top.
I tend to let them stay in for 2-3 hours, I've even left them in over night.  Once fully frozen I divide them up into ziploc bags in easy 1 serving portions I tend to portion them at 5-6 gyoza per bag.

To cook the gyoza after they're frozen take a pan and a lid. My favorite pan to use is my cast iron skillet. 

Add about 2-3 TBS of vegetable oil and heat it up. line up your gyoza like in the picture below. 
One trick I learned is that after you place the gyoza on the pan to move them around a tiny bit so the bottoms get nicely coated with the oil.

Over medium high heat allow the bottoms of the gyoza to start to get a lil crispy.


Once this the bottoms start to look like they're beginning to brown, lightly place the lid on top, make a small opening on one of the side and slowly add a little water about 1/4 cup. The contents of the pan will start popping and sizzling which is why you keep the lid on as much as you can as you add the water.

While on medium high heat, (closest you can get to high heat) with the lid still loosely on cook the gyoza for about 5-7 minutes. It really varies on the type of  pan you're using so keep an eye on it.
The lid is on to hold in the steam. So you are lighly frying the bottoms of the gyoza but the top portion of it and the filling are steam cooked.

Once this is done flip it onto a plate. And you just made yourself some epic gyoza worthy of a total food porn shot, worthy enough to be in a JDrama or Anime go you!

I packed these little guys for my lunch along with some cauliflower tatter tots I made.
Lunch at work tomorrow is going to be a feast ^_^


For dipping sauce I tend to do soy sauce with a touch of sesame oil and a drip of rice wine vinegar.
Example 2 TBS shoyu, 1/8 tsp sesame oil 1/4 tsp rice wine vinegar.
I always end up adjusting it to my tastes. Once I even added Korean red pepper flakes...burning mouth was so worth it.


I hope you give this recipe a try and if you have any requests just leave a comment and I'll try my best ^__^


Nikujaga Recipe

Hi Everyone,

So the other I came home from work and decided I'd make one of my favorite Japanese recipes, Nikujaga. Those of you who watch anime or J-dramas might have seen this, it's a popular recipe in Japan for home cooking. Nikujaga is part of Yoshoku cuisine in Japan.

What is Yoshoku? Yoshoku is what you call "Japanified" foods from western countries. Nikujaga is the Japanese rendition of beef stew, the name literally is Meat and Potatoes. I'm personally a major fan of yoshoku dishes, especially when suggesting Japanese recipes to people who have never made Japanese food before. I kind of like to think of it as a friendly way to introduce people to flavors before getting them to delve into things like Nabe. Plus the ingredients are normally pretty easy to find except maybe for the dashi.

I hope you give my rendition of the nikujaga a try I made 2 small changes to the recipe from all the other ones I see online and I think it just adds to the flavor. This recipe will serve about 4 people.

1 pound shaved beef (can't find shaved? that's ok I'll tell you what you can do in the instructions)
3 large potatoes cut into wedges (bite sized wedges)
3 carrots cut into rolling wedges
1 cup of sugar snap peas or green beans (both are very good in this)
2 medium sized onions

2 cups of water (warm water)
1 TSP of dashi (dashi made of sea weed)
1 TSP garlic paste
4 TBS Sake
4 TBS Shoyu (Soy Sauce)
4 TBS sugar
2 TBS vegetable oil
1 TSP salt (optional)
dash of pepper (optional)

I'm going to be very honest, when I was prepping to make this I was all excited then it hit me....I had no green beans or sugar snap peas, I just love how they taste in this dish so I was unhappy I didn't have them. But it certainly didn't stop me from making nikujaga. So if you don't have them it's ok to omit them although I highly recommend you try to get them.

In a pot add the 2 TBS vegetable oil and saute the onion, garlic paste and shaved beef until the beef begins to brown.


Add your carrots and potatoes.


Stir in the 1 TSP of dashi into your warm water, when the water is warm it helps dissolve the dashi better. You don't necessarily have to use warm water but it helps. Add it to the pot.

Bring it to a boil and let it simmer for about 15 minutes. Then add the sugar, sake, shoyu, salt and pepper. Gently stir, try your best not to break the potatoes.


Then let it simmer until the liquid reduces to 1/2, you can even reduce it to 1/4 the flavors will be more concentrated then.

When you see the liquid is closer to being reduced to half it's original amount add the sugar snap peas or green beans, they can be fresh or frozen and gently mix them in. They'll cook rather fast, usually takes 5-10 minutes.

After that it's ready to serve. You can eat this with rice but I tend not to.


Now if you can't get shaved beef which frankly I can't get my hands on when I go to giant eagle you can make it at home. If you get a large piece of beef like a roast. You can put it in the freezer for about 1 or sometimes closer to 2 hours depending on the size of the roast. You then take it out and make very thin cuts with your knife and it'll shave that way.

You can also make nikujaga with thicker pieces of meat like the size you'd have if you were making a stir fry, I've done this before and I've just added a bit more dashi and let it cook longer so the meat became really tender.

Hope you give my recipe a try and if you have any requests just let me know ^.^

Saturday, April 30, 2016

Green Onion Kimchi Fried Rice

Hi Everyone,

So I know this recipe isn't Japanese but...I had kimchi...lots of kimchi and I thought I'd start getting to use some up. Now I love the classic Napa cabbage kimchi but my other two favorite are green onion kimchi and garlic scape kimchi.

This recipe is versatile and you can use any of the above mentioned types of kimchi in it. You can also try other kinds, if you do let me know what kind you used and how it went ^_^


I need to find ways to use this sucker up, I wish the Korean grocery store sold smaller jars.


This will serve one very hungry otaku, you'll need:

1 cup of cooked japonica rice
1/2 cup green onion kimchi, cut into bite sized pieces
pinch of sugar
pinch or two of salt
1/8 TSP of black pepper
2 TBS of green onion kimchi juice (don't worry it'll be in the jar with the kimchi)
1 egg, lightly beaten
1/2 TSP sesame oil
2 TBS vegetable oil
green onion (fresh) thin slices (optional)

When it comes to making fried rice you can make it with piping hot fresh out of the rice cooker rice, but I prefer using older rice. By older rice I mean oh I made rice at lunch and now I have leftovers for dinner or day/2 day old rice, where it's had some time to lose some of its moisture.

In a heated pan (medium to medium high heat) add 1 TBS of vegetable oil and swirl to coat.
Add your kimchi and stir fry, I like to have the moisture evaporate.
The pieces of kimchi sort of look like they got smaller.


At this point add the rest of the vegetable oil and the rice. You'll slowly break up the rice with your spatula.


The more you do this and stir the rice with the kimchi to combine it'll change color a bit and pick up the red from the kimchi. Now add your salt, pepper, sugar, and kimchi juice, gently stir.
The rice will pick up some more color now let the liquid evaporate.
The rice will be absorbing all the tasty flavors.

Add your sesame oil and give the rice a stir.
Once that is added make a little divot/hole in the center of the pan.
Add your egg in the center, allow it slightly cook at the bottom.
You then want to coat your rice in the egg.


It's sort of the same idea as when you're making a divot when working with dough.


You just let the rice and egg cook (no more runny egg anywhere) 
Now you can plate your delicious kimchi fried rice, Sprinkle on some green onion slices if you want. I know I did ^__^


So this is what I made for dinner tonight, kimchi smells rather pungent when you take it out of the container but it stops when you start cooking it, and it creates a nice flavor. I so had this with some pre-made frozen egg rolls. I was such a lazy girl tonight.

I was originally going to post my recipe for Green Goddess Chicken Sandwich. I know not Japanese but so very tasty but....I realized I ran out of chicken so that ruined that idea but just for reference.
I took a picture when I was testing it for the first time before I added lettuce and put the other piece of bread on top. 

COMING SOON:


If you have any recipe requests please leave a comment ^__^
I hope you give my kimchi fried rice recipe a try.

Saturday, April 2, 2016

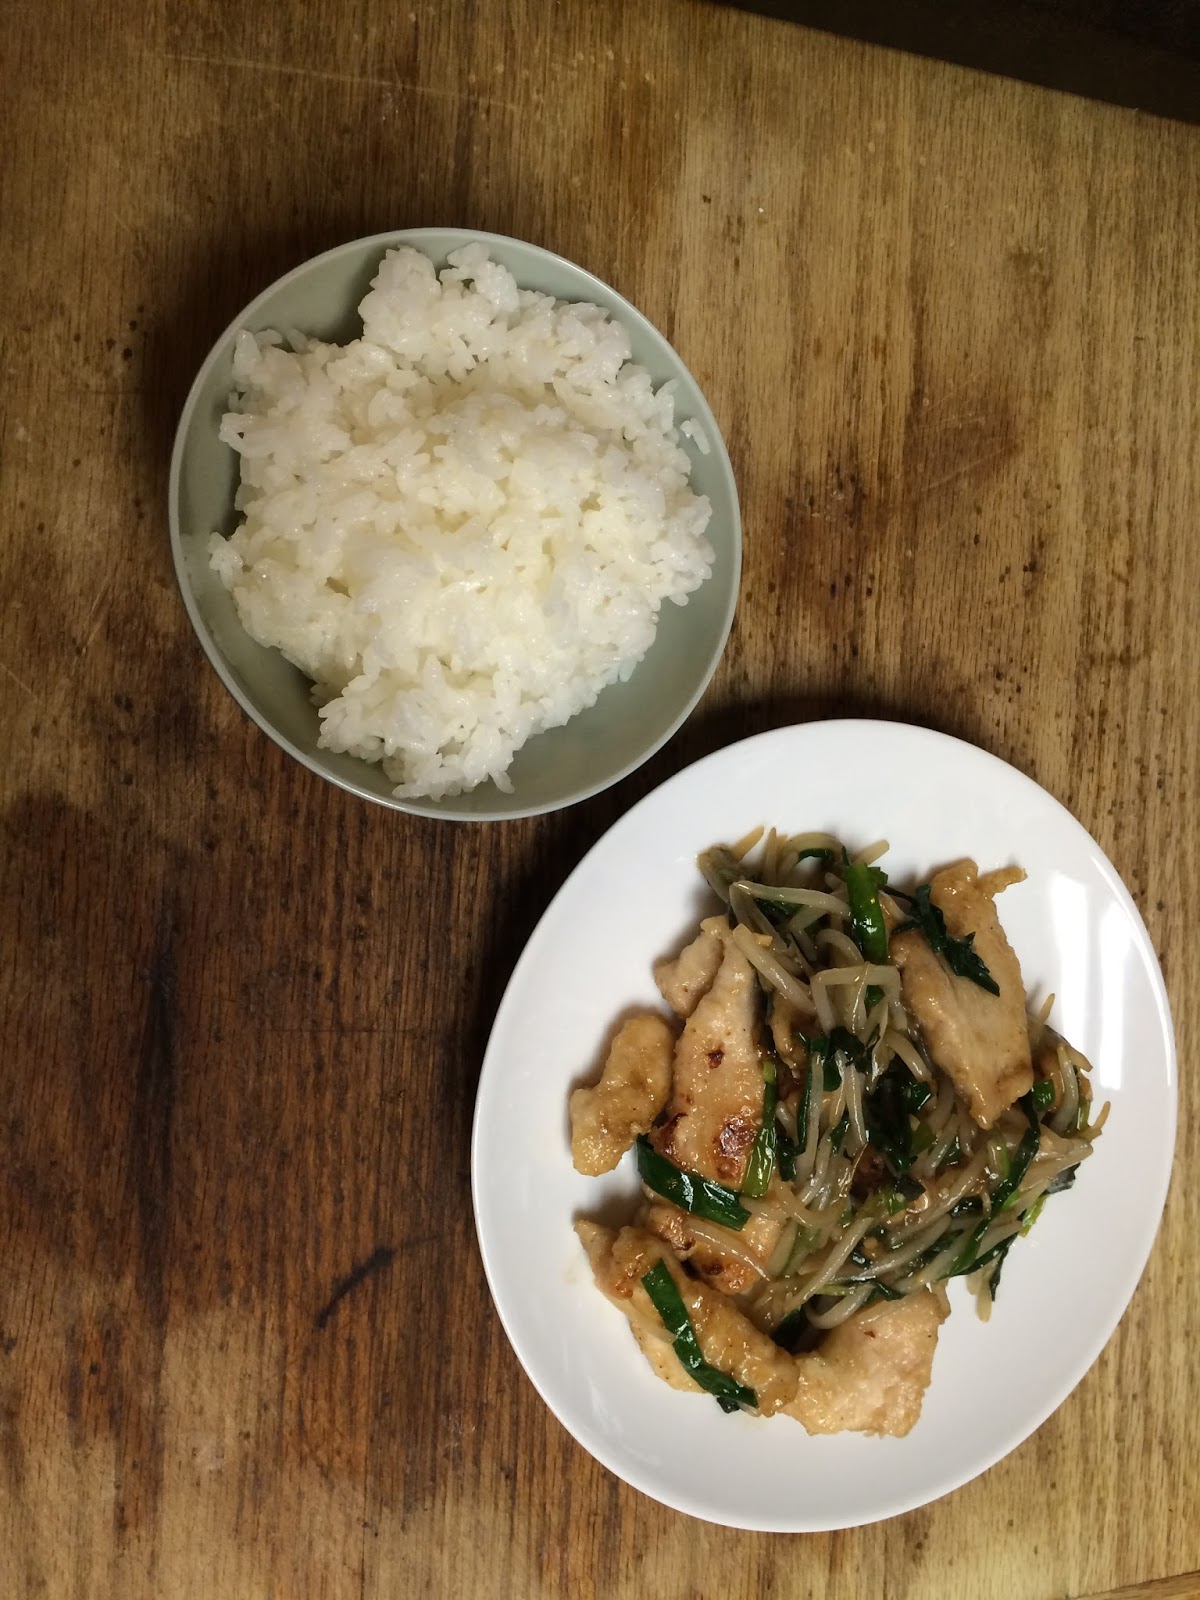
Chicken Nira

Hi Everyone,

For dinner today I made Chicken Nira.
I found a bunch of recipes online for Reba Nira which is Liver and Garlic Chives.
I've always wanted to try this dish but due to having high cholesterol.....I need to avoid it like the plague. So instead I chose to make this dish with Chicken.

This recipe I made from watching and looking up various versions of reba nira I hope you like it.
This should serve 1-2 people, just depends on how hungry you are.

You'll need:

1 chicken breast cut into thin strips.
2 cups of bean sprouts
approximately 1 cup of nira/garlic chives
2 TBS potato starch
1 TSP minced garlic
1/2 TSP ginger paste
2 TBS vegetable oil
2 TBS sesame oil (if you do not have this use vegetable oil)


For the Marinade:
1 TSP ginger paste
1 TSP sake
1 TSP shoyu (soy sauce)
dash of pepper

Sauce:
1 TBS shoyu (soy sauce)
1 TBS sake
1 tsp oyster sauce
1/4 tsp potato starch
dash of pepper

First make sure your bean sprouts are nice and clean. I tend to remove the little sprouty leafy head things on the ends. Also cut your nira into about 2 inch pieces.


Rinse your chicken in water and pat dry with a paper towel.
Thinly slice your chicken.

Mix the ingredients for your marinade together and mix into the chicken.
You can let this sit for a minimum for 10-15 minutes.
I was making rice at the time and it had an hour to go so I let it marinate for about 40 minutes.

After that put 2 TBS potato starch on a plate and gently coat your pieces of chicken.

In a frying pan put about 1-2 TBS of vegetable oil and swirl to coat the pan.
Add your chicken pieces and brown on each side. Once done set the chicken aside.
For the entire cooking process I use the temperature between Medium to Medium High.
Now to the pan add 1-2 TBS of Sesame Oil, if you don't have this you can use vegetable oil again.
Sesame oil just adds a bit of extra flavor to it.
Add your minced garlic and ginger paste. Saute until aromatic.
Add your bean sprouts and gently stir fry.
After about 2 minutes add the nira.
Once the nira start to look like they're beginning to wilt a bit add the chicken back into the pan.
Heat up the chicken.


Mix up the ingredients for your sauce.
Make sure before you add it to the chicken mixture that you stir it.
Potato Starch has a tendency to sink to the bottom.

Gently stir everything until the sauce begins to thicken.
Now it's ready to serve.


I hope you give this recipe a try ^___^
As always if you have any requests please let me know.


Feta Cheese Tamagoyaki

This summary is not available. Please click here to view the post.